Monday, April 18, 2011

The BEST Cookie recipe…ever!

Sometimes, you just need something to eat that is sweet, chewy and conjures warm memories. Like cookies. But when you start dabbling around with baking recipes in general, they usually fall flat (literally) when you take out certain allergens. Like eggs…and milk…and of course butter.

So, after a couple of years I came up with a recipe very similar to this one. And when I stumbled upon this recipe, I was delighted that someone had refined what I hadn’t yet. It’s at Cookie Madness, which also has tons of other helpful recipes!

Chocolate Chip Cookies

(aka Vegan Spelt Chocolate Chip Cookies, something I don’t tell my husband who is the definition of a carnivore, lol.)

1 1/4 cups spelt flour*
1/4 teaspoon salt
1 teaspoon baking powder
1/2 teaspoon baking soda
1/4 cup granulated sugar
1/3 cup maple syrup
1/3 cup canola oil (or other vegetable oil)
1 1/2 teaspoons vanilla extract
1/3 cup toasted pecans
2/3 cup vegan chocolate chips or some cut-up vegan chocolate bar

Preheat oven to 350 degrees F. Line a cookie sheet with parchment, Release foil or just use a non-stick cookie sheet.

In one bowl, thoroughly stir together spelt flour, salt, baking powder, baking soda and sugar.

In a second bowl, stir together maple syrup, oil and vanilla extract.

Add the oil mixture to the spelt mixture and stir until combined. Stir in pecans and chocolate chips.

Drop by rounded tablespoonfuls onto prepared cookie sheet and bake for 11 minutes. (btw, 11 minutes is perfect!)

*I’ve also made these with Amaranth/Quinoa flour, and they turned out great!

Sunday, February 27, 2011

Mac & Goat Cheese Recipe

  • 188558_1814626641003_1100167284_32114367_1010041_n  1/2 lb macaroni (we used the corn macaroni noodles)
  • 2 tablespoons butter (you can use GHEE or DF margarine)
  • 2 tablespoons flour (I used spelt, but I’m sure you could use any sort of flour or even corn starch)
  • 2 cups milk ( I used Almond Milk)
  • ground pepper and salt
  • 1 cup goat cheese ( make sure to have something that melts nicely!)


Directions:

  1. Bring a large pot of lightly salted water to boil.
  2. Add the macaroni and cook about 8 to 10 minutes, or until just tender, depending on the size of the pasta. Drain.
  3. Meanwhile, in a medium saucepan, melt the butter over low heat. When the butter is melted and sizzling, stir in the flour to create a paste and cook 1 minute.
  4. Slowly add the milk, whisking to create a smooth sauce. Let cook about 5 minutes or until thick enough to coat the back of a spoon. ( I ended up adding more butter at this point, lol!)
  5. Remove the pan from the heat and slowly add the goat cheese, whisking to create a smooth sauce. Season with salt and pepper to taste.
  6. Stir noodles and cheese sauce together and enjoy!

NOTE: Since most allergies vary, I had to alter this recipe according to out needs. The possibilities are endless!

This was surprisingly delicious! I would suggest using a mozzarella and cheddar blend for the goat cheese!

Thursday, February 17, 2011

Amaranth

I received a question the other day that I thought I should take the time to explore and share with you.

So many times in gluten-free baking, the recipes call for a variety of flours to substitute wheat flour. And usually, it’s never and equal ratio. And it really bothers most people. Who want to use three different grains just to substitute on cup of wheat flour anyways???

Back to my question of, is there a grain out there that can be used 1:1 instead of wheat flour in a recipe? Well, yes, there is!

The first grain that came to mind was Amaranth. As long as you aren’t baking a yeast  bread, you can use it equal to wheat flour! It is great for cereal, pasta and baking. And not just the grain, the seeds and leaves are good as well!

If you aren’t familiar with Amaranth, it’s a wonderful grain with very dramatic past. You can read all about it in this article by Karen Railey, which I have since bookmarked it was so chalk full of information!

Not only does she share it’s rich history, but she gives some fantastic cooking tips and how to GROW your own! (which I plan on doing this summer!!!) The young leaves can be eaten like spinach! Which is great for my son who has some sensitivity to spinach.
Try some Amaranth today!!! I’m sure you’ll love it!

Thursday, January 6, 2011

How to dehydrate your own cheese!

In my search for a powdered cheese alternative, I kept thinking how much easier it would be if I could just make my own powdered cheese. That, and my son really prefers goat cheese, and honestly I do too. I mean, it real cheese for one thing!

So, finally, I decided that I’m going to try it! I’ll update with pictures when its done. For now, here are the instructions!

For hard cheese:

  • Cut cheese into small pieces. The exact size of the pieces does not matter. They can be as wide or long as you choose. The smaller the pieces, the faster and evener they will dry. The thickness of the slices are important. The cheese slices should be no more than 1/4 inch thick. Thicker slices take too long to dry.

  • Lay the cheese pieces directly on the rack in the food dehydrator. Leave space around each piece of cheese, so that they are not touching each other.

  • Turn the dehydrator on. If the dehydrator has a temperature setting control, choose the lowest setting.

  • Flip the cheese pieces over every three hours. If the food dehydrator doesn’t have a fan, rearrange the trays every few hours. This provides more air flow for more even drying of the cheese pieces. To rearrange the trays, move the top tray to the bottom tray spot and move the other trays one spot up from where they previously were.

  • Remove the cheese pieces from the dehydrator when the cheese is fully dry. Dry cheese appears even-toned in color and is a shade or two darker than fresh cheese. Store the dry cheese in an airtight package.

  • For soft cheeses:

  • Cover the food dehydrator trays with plastic wrap. You will have to cut a hole in the center of the plastic wrap to allow air flow through the center of the food dehydrator.

  • Spread a thin layer of soft cheese over the plastic wrap covered tray. The layer should be no thicker than a 1/4 inch.

  • Turn the dehydrator on. If the dehydrator has a temperature setting control, choose the lowest setting.

  • Rearrange the trays every three hours if the food dehydrator does not have a fan. To rearrange the trays, move the top tray to the bottom tray spot and move the other trays one spot up from where they previously were. If the food dehydrator is equipped with a fan, it is not necessary to rearrange the trays.

  • Check the cheese every three hours. The cheese is done dehydrating when it is dry to the touch. Remove the cheese from the dehydrator and store in an airtight package.

  • Thursday, November 18, 2010

    Egg Substitutes

    When it comes to baking, there is one thing that is very hard to leave out of a recipe. Eggs. Neither of my boys can have eggs, after hearing that I need to store powdered eggs to bake with I was a bit clueless on what I was going to store. Here are some tried and true egg substitutes made from things most allergy friendly families have on hand. I also included on of my favorite baking secrets when baking eggless.
    • 2 tbsp cornstarch = 1 egg
    • 2 tbsp arrowroot flour = 1 egg
    • 2 tbsp potato starch = 1 egg
    • 1 heaping tbsp soy powder + 2 tbsp water = 1 egg
    • 1 tbsp soy milk powder + 1 tbsp cornstarch + 2 tbsp water = 1 egg.
    • 1 banana = 1 egg in cakes and pancakes!
    • 1 tbsp milled flax seed and 3 tbsp water = 1 egg. Light, fluffy cakes!

    Now for my favorite baking ingredient….Salvia Hispanica, or more commonly known from the name brand as Salba. (It's actually the Chia pet, lol!) They harvest the seed and it is sold as a supplement, similar to flax. But what I use it for, is to make a gel out of it. By taking the seeds, adding water to them and letting them sit over night or at least a couple of hours, it creates a gel around the seeds that is just like the egg whites! I use it for baking and it really holds up! I was able to make a moist bread that didn't just crumble when you touch it (which commonly happens when you have to cook without eggs, yeast and gluten as a binder). If the labels doesn't have the directions it’s:
    1 part Salba + 8 parts water = 1 egg Combine in a glass jar and let sit overnight or at least an hour.

    Wednesday, November 17, 2010

    Milk Alternatives

    Before I started food storage, I bought Almond milk or Coconut milk in the carton once a week. But as I realized (when reaching for an extra carton that was gone already) I needed to have some for storage, I ran into a serious problem. I could only find powdered Soy and Cow milk. With my youngest son having a soy intolerance, I was very worried that I would never be able to find a powdered milk to store. For about a year I searched high and low for a powdered milk alternative. I found some great alternative to dairy and hopefully you can enjoy some of these as well. If you don’t have an issue with milk or dairy, you are one lucky dog!
    Here are some of the powdered milk alternatives that I have found:
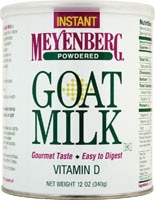
    • Powdered and Evaporated goat milk. The powdered is something that you can usually find at any Wal-Mart or Meijer’s. They come in 12oz. cans that make about 3 quarts. Usually running about $12 a can or from the maker 12 cans (case) for $117.00. The evaporated (which is ideal when baking!) comes in 12 0z. cans and from the maker come in cases of 12 for about $30.

    • DariFree is our personal favorite. It comes in a 19.5 oz can and makes about 6 quarts of milk. Available in vanilla or chocolate (yum) &  believe it or not it’s potato based of all things! Gluten-Free Casein-Free Fat-Free Soy-Free Rice-Free MSG-Free Protein-Free Cholesterol-Free

    • Soy based powdered milks are not hard to find. Just type in “Powdered Soy Milk” in your search box and you’ll instantly have at least four to choose from. Beings that they are so easy to find, I won’t run through the different brands out there. *Know ,though, that most soy products are coming under fire for not being as nutritious as thought. Since most of our soy in the US is genetically modified and cooked at such a high heat,  they lose most benefits. Also, in recent studies among men who consume a large amount of soy, there are some undesired side effects in the “man region” and health. Just saying….

    • Coconut milk is another alternative that is great for baking and cooking. You can find it canned, which should be reserved for use in baking/cooking and not drinking. Also, you can buy it dry or powdered. With a  quick search I found a pound of it on Amazon for $9.00. We have only used the liquid before, but if it’s similar in taste, it should be very good! I would like to get my hands on some.

    Cooking Essentials

    I titled this section Cooking Essential, because lets face it, when you have sensitivities or allergies to foods, that will inevitably effect how you cook and bake. With our restrictions so many staple ingredients, I’ve had to really become creative when cooking and storing foods. It’s easy when you can have eggs, dairy, yeast and cheeses. They sell 10 pound cans of dehydrated or freeze dried cooking essentials. But when you can’t have those things, you have to either look for an alternative or figure out how to store the substitutions you use everyday. I’ve tried to think of all the staples from cooking and baking that I substitute with and comply them in sections. If you see anything missing, please let me know!
    • Milk Alternatives
    • Egg Alternatives
    • Cheese Alternatives
    • Baking Powder/Soda,  Vinegar and Yeast Sensitivity (*note: under advisement of our Dr. we were able to introduce sourdough spelt bread to our boys. Since they have only a yeast sensitivity, be it a high one, naturally occurring yeast is tolerable. If you have a yeast ALLERGY please don’t ever experiment with it unless advised by your Dr.)
    • Misc. For example broth, bouillon, chocolate chips…You know random cooking goodies ;)